
| 일 | 월 | 화 | 수 | 목 | 금 | 토 |
|---|---|---|---|---|---|---|
| 1 | 2 | 3 | 4 | |||
| 5 | 6 | 7 | 8 | 9 | 10 | 11 |
| 12 | 13 | 14 | 15 | 16 | 17 | 18 |
| 19 | 20 | 21 | 22 | 23 | 24 | 25 |
| 26 | 27 | 28 | 29 | 30 |
- EC2
- JavaScript
- MAC address
- Operating System
- aws s3
- Spring
- kubectl
- dns
- Python
- CVAT
- airflow
- PostgreSQL
- zookeeper
- Packet
- Terraform
- Kafka
- AWS
- jvm
- ip
- Network
- OS
- CSV
- kubeadm
- grafana
- kubernetes
- java
- log
- tcp
- docker
- helm
- Today
- Total
JUST WRITE
GlusterFS 설치 본문

GlusterFS 설치
고객사에 요청에 의해서 Active-Active 한 File Server 구성을 요청받았습니다.
주어진 Server는 OS가 Oracle Linux 7인 Server 2개였습니다.
몇 가지 후보군 중에 GlusterFS 통해 File Server를 구성하기로 하였습니다.
What is GlusterFS
GlusterFS는 Open Source로 분산 File System입니다.
Metadata를 따로 가지고 있지 않는 것이 큰 특징입니다.
Gluster Volume을 통해 File을 관리하게 됩니다.
Gluster Volume은 Server내에 구성한 Brick들로 구성됩니다.
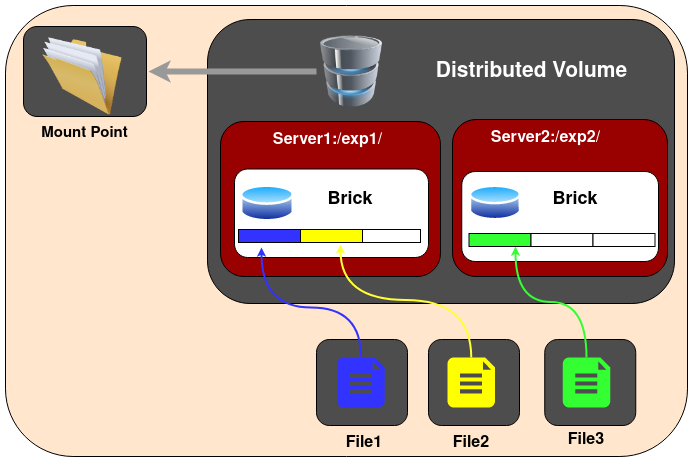
Gluster Volume의 종류는 아래와 같습니다.
- Distributed Volume -> 각 Brick에 File단위로 분산 저장
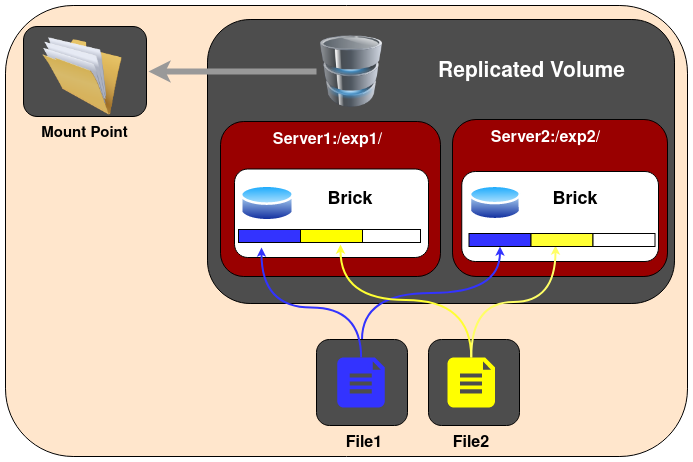
- Replicated Volume -> File이 지정한 Replica 개수에 맞춰 Brick에 복제되어 저장
- Distributed Replicated Volume
- File을 설정한 Replica만큼 복제 저장될 뿐만 아니라 File단위로 분산 저장
- Brick의 수의 Replica의 배수만큼 설정되어야 함.

- Dispersed Volume

- Distribued Dispersed Volume

GlusterFS 설치 준비
GlusterFS 설치 전에 준비할 사항이 있습니다.먼저 Gluster Volume을 mount할 path를 세팅해야 합니다.해당 path의 File System이 XFS로 설정합니다.XFS가 필수는 아니지만 공식문서에서 추천하고 있습니다.XFS에 필요한 package을 설치합니다.
$ yum install -y xfsprogsGlusterFS Volume으로 사용할 Disk를 XFS로 포맷합니다.
mkfs.xfs -f -i size=512 /dev/sdc1

parted /dev/sdc1
GNU Parted 3.1
Using /dev/sdc1
Welcome to GNU Parted! Type 'help' to view a list of commands.
(parted) p
Model: Unknown (unknown)
Disk /dev/sdc1: 16.0TB
Sector size (logical/physical): 512B/4096B
Partition Table: loop
Disk Flags:

Number  Start  End     Size    File system  Flags
 1      0.00B  16.0TB  16.0TB  xfs
포맷 후 Disk를 mount 합니다.
$ mkdir /mnt/xvdb
$ mount /dev/xvdb /mnt/xvdb

# fstab에 추가
$ vi /etc/fstab

...
/dev/xvdb  /mnt/xvdb   xfs   defaults  1  2
그리고 Gluster용 Directory를 생성합니다.
$ mkidr /mnt/xvdb/gluster_volGlusterFS 설치
먼저 GlusterFS 설치할 수 있도록 yum repository를 추가합니다.
$ vi /etc/yum.repos.d/Gluster.repo

[gluster]
# OS 버전에 맞춰 주소를 지정한다.
baseurl=http://mirror.centos.org/centos/7/storage/x86_64/gluster-9/

gpgcheck=0
enabled=1
추가 후 package를 설치합니다.
설치 후 glusterd Service를 실행시킵니다.
# GlusterFS Server 설치
$ yum -y install glusterfs-server glusterfs-geo-replication.x86_64

# GlusterFS Client 설치
$ yum install -y  glusterfs glusterfs-cli glusterfs-fuse attr

# Service 실행
$ systemctl enable glusterd --now
GlusterFS 설정
세팅할 Server가 2개이므로 서로 연결해주는 작업이 필요합니다.
1번 Server에서 아래 command를 실행하면 됩니다.
command 실행 전에 2개 Server간 방화벽을 해제해줘야 합니다.
그리고 /etc/hosts를 수정하여 hostname을 지정해 줍니다.
$ gluster peer probe ${2번 server host명}

# peer 확인
$ gluster pool list
UUID                   Hostname        State
***-***-***-***-***    ***             Connected
***-***-***-***-***    ***             Connected
GluserFS Volume을 생성합니다.
아까 생성한 GlusterFS Volume용 path에 연결해서 생성합니다.
이번에는 Active-Active 하게 작동할 목적이므로 Replicated Volume으로 생성하였습니다.
$ gluster volume create replicated_vol replica 2 ${1번 hostname}:/mnt/xvdb/gluster_vol ${2번 hostname}:/mnt/xvdb/gluster_volVolume 생성 후 Volume 작동하도록 합니다.
$ gluster volume start replicated_vol

$ gluster volume status

Status of volume: replicated_vol
Gluster process                             TCP Port  RDMA Port  Online  Pid
------------------------------------------------------------------------------
Brick[1] ***:/mnt/xvdb/***         49152     0          Y       36865
Brick ***:/mnt/xvdb/***           49152     0          Y       45231
Self-heal Daemon[2] on localhost               N/A       N/A        Y       36882
Self-heal Daemon on swmeaidt05              N/A       N/A        Y       45248

Task Status of Volume replicated_vol
------------------------------------------------------------------------------
There are no active volume tasks
Volume status를 확인해 보면 49152 Port로 Brick 관련 Process가 실행 중인 것을 알 수 있다.
해당 Process를 통해 Volume 간 Brick 간의 작업을 진행합니다.
이렇게 하면 설치가 끝나고 Volume으로 설정한 Path에 파일을 수정하면 다른 peer에도 똑같이 적용됩니다.
[참고사이트]
'Data' 카테고리의 다른 글
| Trino 한번 써보겠습니다(2) - Hive Metastore와 AWS S3 연결 (0) | 2023.08.09 |
|---|---|
| Trino 한번 써보겠습니다(1) - Kubernetes에 Trino 설치 (0) | 2023.07.17 |
| AWS EC2 Nifi 설치 (0) | 2022.11.23 |
| What is Nifi (0) | 2022.11.21 |
| What is MinIO? (0) | 2022.10.20 |


