
| 일 | 월 | 화 | 수 | 목 | 금 | 토 |
|---|---|---|---|---|---|---|
| 1 | 2 | 3 | 4 | 5 | 6 | |
| 7 | 8 | 9 | 10 | 11 | 12 | 13 |
| 14 | 15 | 16 | 17 | 18 | 19 | 20 |
| 21 | 22 | 23 | 24 | 25 | 26 | 27 |
| 28 | 29 | 30 | 31 |
- EC2
- aws s3
- MAC address
- AWS
- PostgreSQL
- Operating System
- kubernetes
- zookeeper
- Python
- airflow
- java
- kubeadm
- grafana
- Spring
- Vision
- log
- CVAT
- JavaScript
- ip
- kubectl
- Network
- Kafka
- aws ec2
- helm
- AWS Redshift
- OS
- docker
- CSV
- jvm
- Packet
- Today
- Total
JUST WRITE
Client VPN 구성 - Private Subnet 외부에서 접근 본문

Client VPN 구성
보안을 위해 AWS Cloud 리소스 일부를 Private Subnet내에 구성하였습니다.
보통 AWS 리소스의 네트워크 접근을 제한할 때 보안그룹 inbound 설정을 통해서 합니다.
Private Subnet 구성을 통해서 네트워크 접근을 막을 수 있습니다.
Private Subnet을 생성해서 subnet 안에서만 접근할 수 있도록 설정하는 것입니다.
기본으로 생성되어 있는 subnet은 Internet Gateway를 통해 외부에서 접근 가능합니다.
Private Subnet은 구성시 Internet Gateway를 연결하지 않고
라우팅 테이블 설정을 통해 subnet 내부에서만 통신하도록 설정합니다.
하지만 subnet 외부에서 접근을 해야 될 경우도 있습니다.
그래서 상시적으로는 아니지만 필요할 경우에만 외부에서 Private Subnet에 접근할 수 있도록 할 수 있습니다.
Client VPN을 활용하면 가능합니다.
Client VPN
AWS Client VPN은 AWS 리소스에 액세스할 수 있도록 하는 관리형 클라이언트 기반 VPN 서비스입니다.
OpenVPN 기반 VPN 클라이언트를 사용하여 어떤 위치에서든 리소스에 액세스 할 수 있습니다.
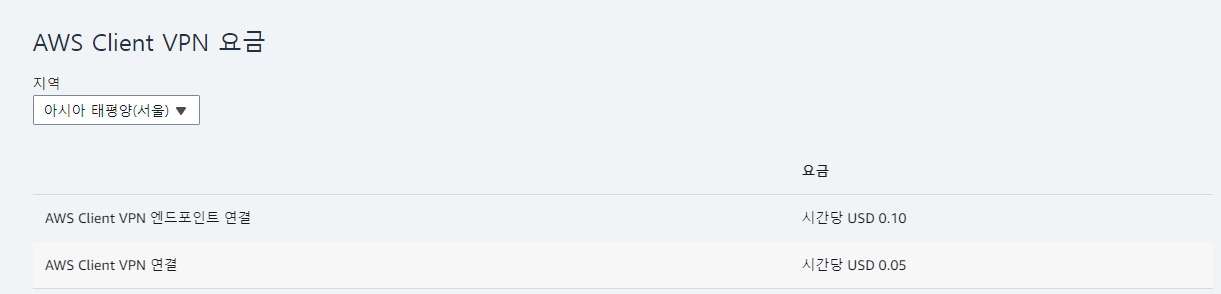
24년 2월 27일 기준 Client VPN 비용은 아래와 같습니다.
인증서 생성
인증에 성공해야 Client VPN Endpoint에 연결하고 VPN Session을 설정합니다.
인증을 하는 방식이 몇가지 있지만 해당 포스팅에서는 인증서를 생성해서 인증을 진행하도록 하겠습니다.
OpenVPN easy-ras를 사용하여 Server 및 Client 인증서와 키를 생성합니다.
easy-rsa Github에서 release를 다운로드합니다.
$ wget https://github.com/OpenVPN/easy-rsa/releases/download/v3.1.6/EasyRSA-3.1.6.tgz
$ tar xzf EasyRSA-3.1.6.tgz
먼저 새 PKI 환경을 시작합니다.
init-pki 명령어를 실행하면 이전에 만들었던 인증서와 키를 삭제합니다.
$ cd EasyRSA-3.1.6
$ ./easyrsa init-pki

WARNING!!!

You are about to remove the EASYRSA_PKI at:
* /home/cox/workspace/jsw/EasyRSA-3.1.6/pki

and initialize a fresh PKI here.

Type the word 'yes' to continue, or any other input to abort.
  Confirm removal: yes

* SECOND WARNING!!!

* This will remove everything in your current PKI directory.
  To keep your current settings use 'init-pki soft' instead.
  Using 'init-pki soft' is recommended.

Type the word 'yes' to continue, or any other input to abort.
  Remove current 'vars' file? yes


Notice
------
'init-pki' complete; you may now create a CA or requests.

Your newly created PKI dir is:
* /home/cox/workspace/jsw/EasyRSA-3.1.6/pki

Using Easy-RSA configuration:
* /home/cox/workspace/jsw/EasyRSA-3.1.6/pki/vars

IMPORTANT:
  Easy-RSA 'vars' template file has been created in your new PKI.
  Edit this 'vars' file to customise the settings for your PKI.
  To use a global vars file, use global option --vars=<FILE>
새 CA를 빌드합니다.
build-ca 명령어를 사용합니다.
easy-rsa path 하위 pki 폴더에 ca.crt 파일이 생긴 것을 알 수 있습니다.
$ ./easyrsa build-ca nopass
Using Easy-RSA 'vars' configuration:
* /home/cox/workspace/jsw/EasyRSA-3.1.6/pki/vars

Using SSL:
* openssl OpenSSL 3.0.2 15 Mar 2022 (Library: OpenSSL 3.0.2 15 Mar 2022)
.....+.......+...+..+.+.....+....+.....+............+.+.....+...+....+...+..+...+++++++++++++++++++++++++++++++++++++++++++++++++++++++++++++++++*.........+....+..+.+.....+..........+..+.......+...+..+...+.......+++++++++++++++++++++++++++++++++++++++++++++++++++++++++++++++++*......+....+.........+...+.....+...+.+.....+.+..+.+...........+...+.+..+.........................+...+...........+.+...........................+......+..+...+.+.........+...........+...+......+......+.+.........+++++++++++++++++++++++++++++++++++++++++++++++++++++++++++++++++
..+.........+.....+...+.+............+.....+...+....+...+..+......+.......+...+.....+......+...+...+...+.+++++++++++++++++++++++++++++++++++++++++++++++++++++++++++++++++*.......+...+..+.......+..+....+.....+....+...+...+..+....+++++++++++++++++++++++++++++++++++++++++++++++++++++++++++++++++*.....+.....+.+......+...+.....+.+............+..+............+..........+......+...+..+............+............+....+..+...+......+...+.+..............+.+......+........+...+..........+...+............+..+.......+...+............+.....+....+..............+.......+........+.+......+.........+..+..................+.+......+............+..+.+........+....+......+..............+.+......+...+++++++++++++++++++++++++++++++++++++++++++++++++++++++++++++++++
-----
You are about to be asked to enter information that will be incorporated
into your certificate request.
What you are about to enter is what is called a Distinguished Name or a DN.
There are quite a few fields but you can leave some blank
For some fields there will be a default value,
If you enter '.', the field will be left blank.
-----
Common Name (eg: your user, host, or server name) [Easy-RSA CA]:${client 도메인}

Notice
------
CA creation complete. Your new CA certificate is at:
* /home/cox/workspace/jsw/EasyRSA-3.1.6/pki/ca.crt
Server의 인증서와 키를 생성합니다.
build-server-full 명령어를 사용합니다.
$ ./easyrsa build-server-full server nopass
Using Easy-RSA 'vars' configuration:
* /home/cox/workspace/jsw/EasyRSA-3.1.6/pki/vars

Using SSL:
* openssl OpenSSL 3.0.2 15 Mar 2022 (Library: OpenSSL 3.0.2 15 Mar 2022)
..+...+......+....+...+++++++++++++++++++++++++++++++++++++++++++++++++++++++++++++++++*.........+.+.....+...+.......+...........+....+......+..+......+.+.........+............+..+.+..+.......+++++++++++++++++++++++++++++++++++++++++++++++++++++++++++++++++*........+...+......+.+.....+.+...+......+........+.......+.....+....+.....+++++++++++++++++++++++++++++++++++++++++++++++++++++++++++++++++
......+......+...+..+....+...+...+..+......+.+.....+......+...+......+.+..+.+......+........+...+++++++++++++++++++++++++++++++++++++++++++++++++++++++++++++++++*....+.........+...+..+....+..+++++++++++++++++++++++++++++++++++++++++++++++++++++++++++++++++*......+.....+.+......+..+.+..+....+........+................+...........+....+.........+.....+...+....+...........+....+...+...+..............+.+..+............+.....................+.........+...+..........+........+...+.+........+..........+..+.+..+................+..+.......+........+....+.....+.+.................+.......+...+...........+.......+........+......+.........+.......+..+.+.....+......+..........+.......................+...+....+........+.+.....+.+...+............+...+..+.+++++++++++++++++++++++++++++++++++++++++++++++++++++++++++++++++
-----

Notice
------
Private-Key and Public-Certificate-Request files created.
Your files are:
* req: /home/cox/workspace/jsw/EasyRSA-3.1.6/pki/reqs/server.req
* key: /home/cox/workspace/jsw/EasyRSA-3.1.6/pki/private/server.key

You are about to sign the following certificate:
Request subject, to be signed as a server certificate
for '825' days:

subject=
    commonName                = server

Type the word 'yes' to continue, or any other input to abort.
  Confirm request details: yes

Using configuration from /home/cox/workspace/jsw/EasyRSA-3.1.6/pki/openssl-easyrsa.cnf
Check that the request matches the signature
Signature ok
The Subject's Distinguished Name is as follows
commonName            :ASN.1 12:'server'
Certificate is to be certified until Jun  1 09:49:10 2026 GMT (825 days)

Write out database with 1 new entries
Data Base Updated

Notice
------
Certificate created at:
* /home/cox/workspace/jsw/EasyRSA-3.1.6/pki/issued/server.crt

Notice
------
Inline file created:
* /home/cox/workspace/jsw/EasyRSA-3.1.6/pki/inline/server.inline
Client 인증서와 키를 생성합니다.
$ ./easyrsa build-client-full ${client domain} nopass
Using Easy-RSA 'vars' configuration:
* /home/cox/workspace/jsw/EasyRSA-3.1.6/pki/vars

Using SSL:
* openssl OpenSSL 3.0.2 15 Mar 2022 (Library: OpenSSL 3.0.2 15 Mar 2022)
.......+.+.....+......+...+......+++++++++++++++++++++++++++++++++++++++++++++++++++++++++++++++++*.......+.........+++++++++++++++++++++++++++++++++++++++++++++++++++++++++++++++++*........+.........+.+...........+...+.+...+......+.....+.......+.........+...+..+...+...+.......+...+........+..........+...........+......+..................+.+.........+..+.......+..+.+++++++++++++++++++++++++++++++++++++++++++++++++++++++++++++++++
.+...+.+.....+.+++++++++++++++++++++++++++++++++++++++++++++++++++++++++++++++++*..+...+......+.+...+++++++++++++++++++++++++++++++++++++++++++++++++++++++++++++++++*..+...+.+......+........+++++++++++++++++++++++++++++++++++++++++++++++++++++++++++++++++
-----

Notice
------
Private-Key and Public-Certificate-Request files created.
Your files are:
* req: /home/cox/workspace/jsw/EasyRSA-3.1.6/pki/reqs/${client domain}.req
* key: /home/cox/workspace/jsw/EasyRSA-3.1.6/pki/private/${client domain}.key

You are about to sign the following certificate:
Request subject, to be signed as a client certificate
for '825' days:

subject=
    commonName                = test.com

Type the word 'yes' to continue, or any other input to abort.
  Confirm request details: yes

Using configuration from /home/cox/workspace/jsw/EasyRSA-3.1.6/pki/openssl-easyrsa.cnf
Check that the request matches the signature
Signature ok
The Subject's Distinguished Name is as follows
commonName            :ASN.1 12:'test.com'
Certificate is to be certified until Jun  1 09:52:01 2026 GMT (825 days)

Write out database with 1 new entries
Data Base Updated

Notice
------
Certificate created at:
* /home/cox/workspace/jsw/EasyRSA-3.1.6/pki/issued/${client domain}.crt

Notice
------
Inline file created:
* /home/cox/workspace/jsw/EasyRSA-3.1.6/pki/inline/${client domain}.inline
그럼 위에서 만든
- ca.crt
- Server 인증서 및 키
- Client 인증서 및 키
한 곳으로 정리합니다.
# folder 생성
$ mkdir ~/custom_folder

# 인증서 및 키 정리
$ cp pki/ca.crt ~/custom_folder/
$ cp pki/issued/server.crt ~/custom_folder/
$ cp pki/private/server.key ~/custom_folder/
$ cp pki/issued/${client domain}.crt ~/custom_folder/
$ cp pki/private/${client domain}.key ~/custom_folder/

$ ll ~/custom_folder/
total 36
drwxrwxr-x  2 cox cox 4096 Feb 27 18:58 ./
drwxr-x--- 17 cox cox 4096 Feb 27 18:56 ../
-rw-------  1 cox cox 1192 Feb 27 18:56 ca.crt
-rw-------  1 cox cox 4595 Feb 27 18:57 server.crt
-rw-------  1 cox cox 1704 Feb 27 18:58 server.key
-rw-------  1 cox cox 4481 Feb 27 18:58 ${client domain}.crt
-rw-------  1 cox cox 1704 Feb 27 18:58 ${client domain}.key
ACM 등록
위에서 생성한 인증서와 키를 ACM(AWS Certificate Manager)에 등록해야 합니다.
AWS내 리소스에서 TLS 접근 관련한 인증서를 관리해 주는 서비스입니다.
ACM에서 인증서 가져오기로 등록 가능합니다.
세 가지 항목에는 아래 정보들을 기입해 줍니다.
- 인증서 본문 -> server.crt
- 인증서 프라이빗 키 -> sever.key
- 인증서 체인 -> ca.crt
각각 아래 부분만 기입해 주면 됩니다.
-----BEGIN CERTIFICATE-----

..

...

...

-----END CERTIFICATE-----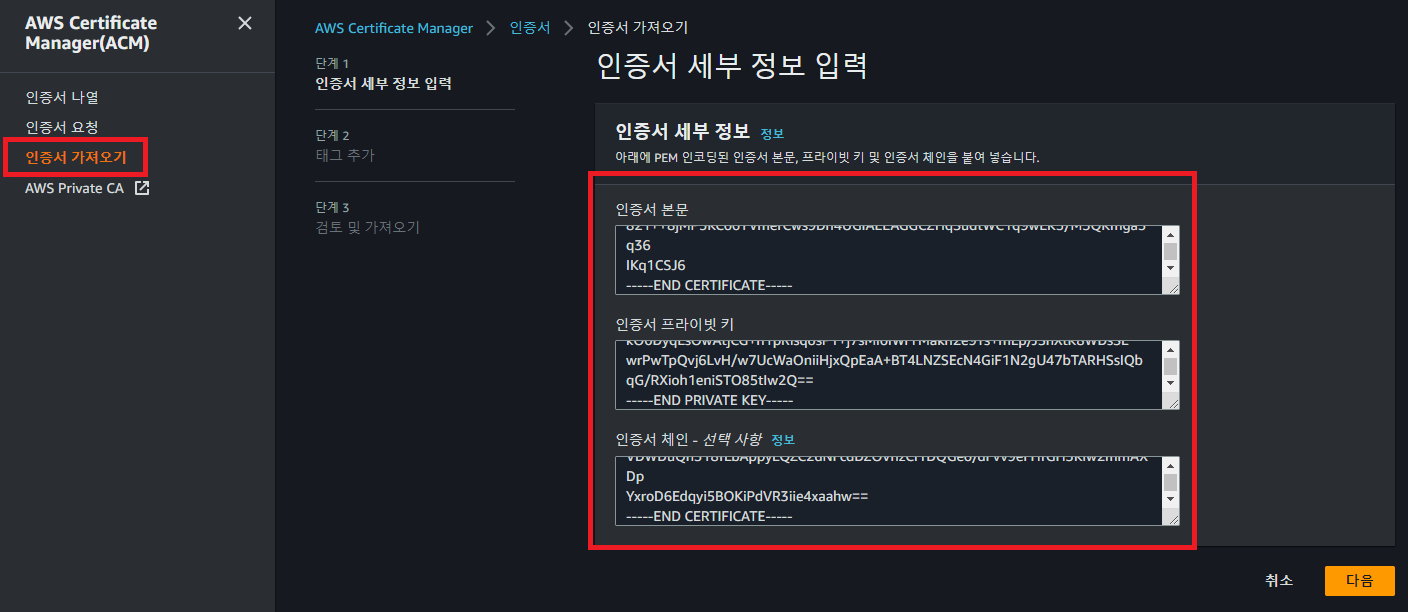
Client도 동일하게 인증서 가져오기로 등록합니다.
세 가지 항목에는 아래 정보들을 기입해 줍니다.
- 인증서 본문 -> ${client domain}.crt
- 인증서 프라이빗 키 -> ${client domain} .key
- 인증서 체인 -> ca.crt
인증서 가져오기에 성공하면 아래와 같이 인등서 리스트를 확인할 수 있습니다.

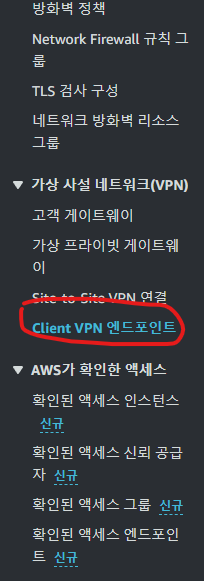
Client VPN Endpoint 생성
Client가 접속하기 위한 Endpoint를 생성해야 합니다.
AWS VPC 서비스 하위 메뉴에서 Client VPN Endpoint를 생성할 수 있습니다.
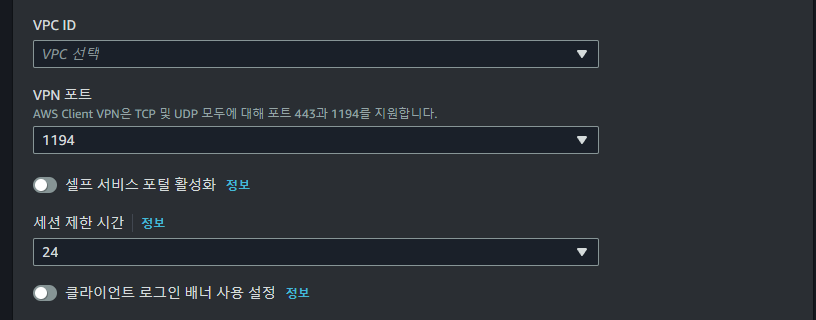
Client VPN Endpoint를 생성하면 아래와 같은 정보를 입력해줘야 합니다.
Client IPv4 CIDR를 입력할 때 연결할 Private Subnet IP 대역대와 겹치면 안 됩니다.
CIDR 블록은 /12보다 크거나 /22보다는 작을 수 없습니다.
상호 인증 사용을 체크해 줍니다.
서버 인증서 ARN, 클라이언트 인증서 ARN에는 ACM에서 등록한 인증서 ARN을 선택합니다.
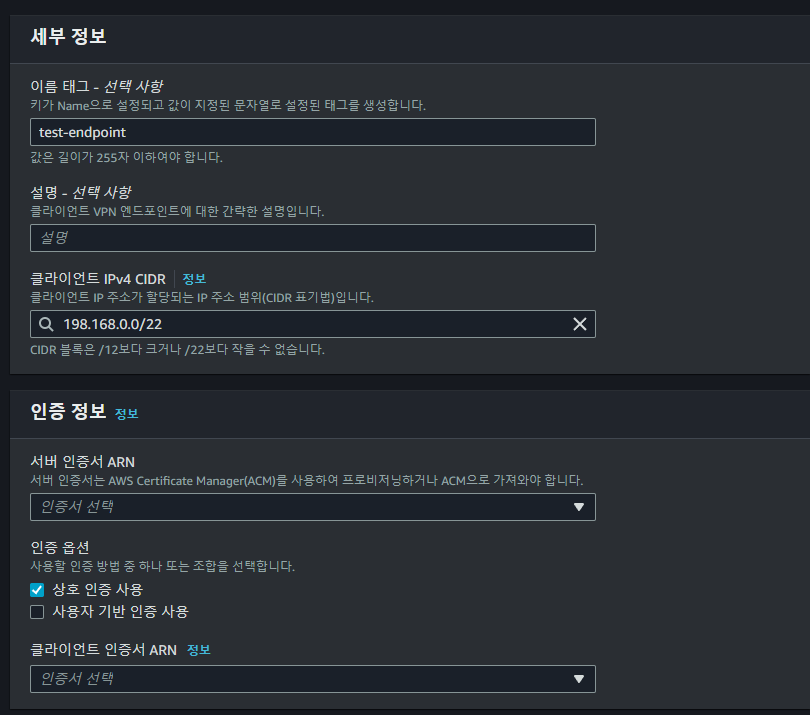
VPN 포트는 1194로 변경해 줍니다.
Client VPN Endpoint가 생성된 것을 알 수 있습니다.
상태는 Pending-associate 상태입니다.

대상 네트워크에 연결
이제 생성한 Client VPN Endpoint를 접속하고자 하는 Private Subnet에 연결합니다.

접속하고자 하는 Private Subnet의 VPC와 해당 Subnet을 선택합니다.
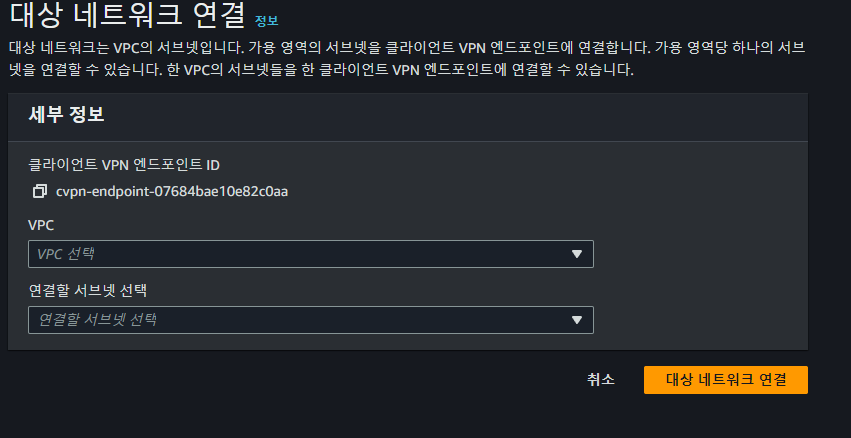
연결을 하게 되면 처음 상태는 Associating 상태가 됩니다.
시간이 좀 지나면 상태가 Active로 변하면서 연결이 가능해집니다.


Client VPN 세팅
제일 먼저 접속하고자 하는 PC에서 OpenVPN을 설치해 줍니다.
윈도우 Client 프로그램이라 쉽게 설치 가능합니다.
Community Downloads - Open Source VPN | OpenVPN
The OpenVPN community shares the open source OpenVPN. Download the latest version of the open source VPN release OpenVPN 2.6.3 for a secure network.
openvpn.net
OpenVPN을 설치하고 AWS Client VPN Endpoint에 접속하려면 설정파일이 필요합니다.
설정파일은 Console 화면에서 클라이언트 구성 다운로드를 클릭하시면 다운로드됩니다.

ovpn 확장명으로 아래와 같은 내용의 파일을 다운로드하게 됩니다.
민감정보는 ***으로 처리하였습니다.
client
dev tun
proto udp
remote cvpn-endpoint-********.prod.clientvpn.us-east-2.amazonaws.com 1194
remote-random-hostname
resolv-retry infinite
nobind
remote-cert-tls server
cipher AES-256-GCM
verb 3
<ca>
-----BEGIN CERTIFICATE-----
****
****
-----END CERTIFICATE-----

</ca>


reneg-sec 0

verify-x509-name server name
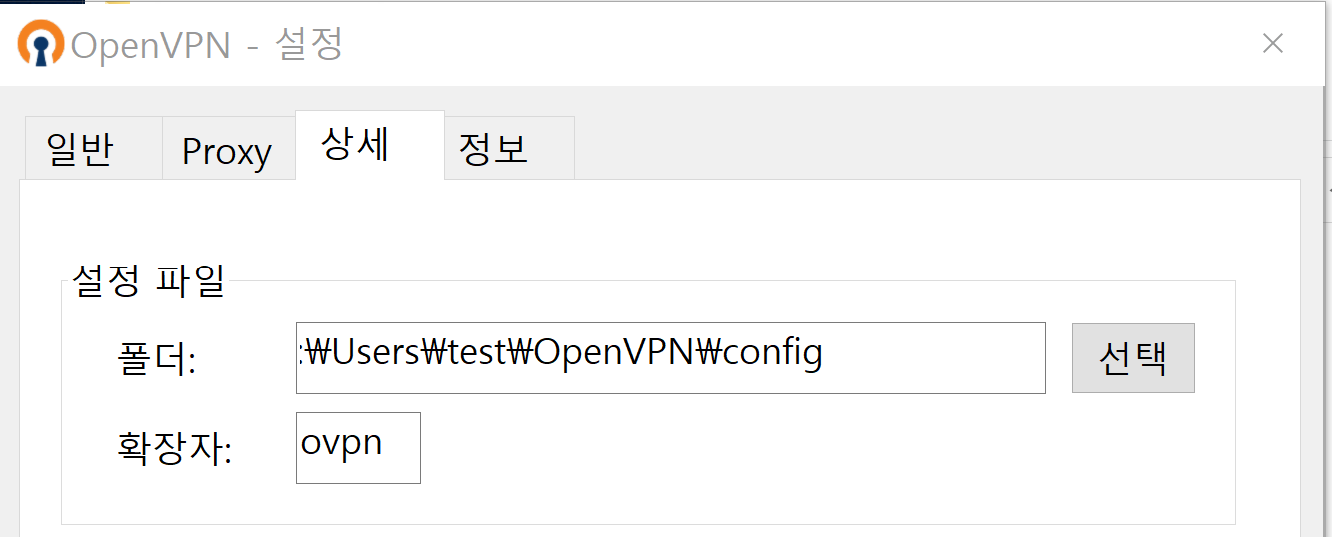
OpenVPN에서 사용할 수 있도록 다운로드한 설정파일을 config path로 이동시켜 줍니다.
OpenVPN config path는 [설정]-[상세]에서 확인 가능합니다.
Client로 등록했던 인증서와 key파일을 세팅해 줍니다.
해당 파일들을 설정파일과 같은 path로 복사해 줍니다.
그리고 설정파일에 Client 인증서와 key파일을 세팅 부분을 추가해 줍니다.
- ${client domain}.crt
- ${client domain}.key
cert ${client domain}.crt
key ${client domain}.key
세팅은 끝이 났습니다.
이제 Private subnet에 있는 EC2에 접속해 보겠습니다.
OpenVPN 연결
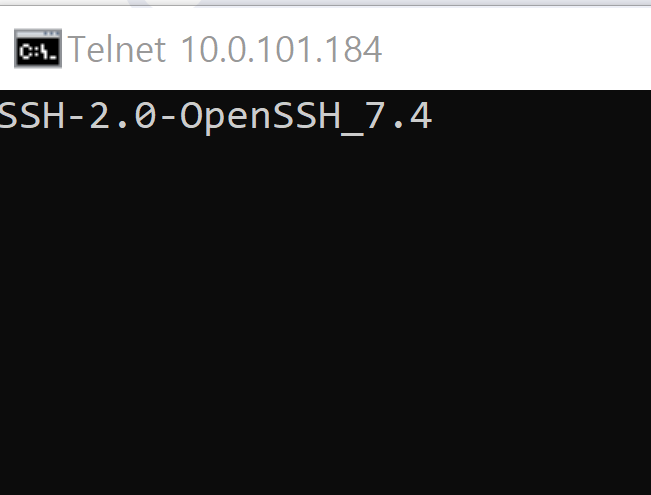
OpenVPN 연결 전 Client PC에서 Private Subnet에 있는 EC2에 접속을 시도하였습니다.
EC2에 보안그룹으로 inbound로 22 포트는 해제한 상태입니다.
Client PC에서 해당 EC2로 telnet 22 포트로 접속을 시도하였습니다.
하지만 Connect failed가 된 것을 확인할 수 있습니다.

OpenVPN을 설정한 파일을 통해 Client VPN Endpoint에 연결하였습니다.
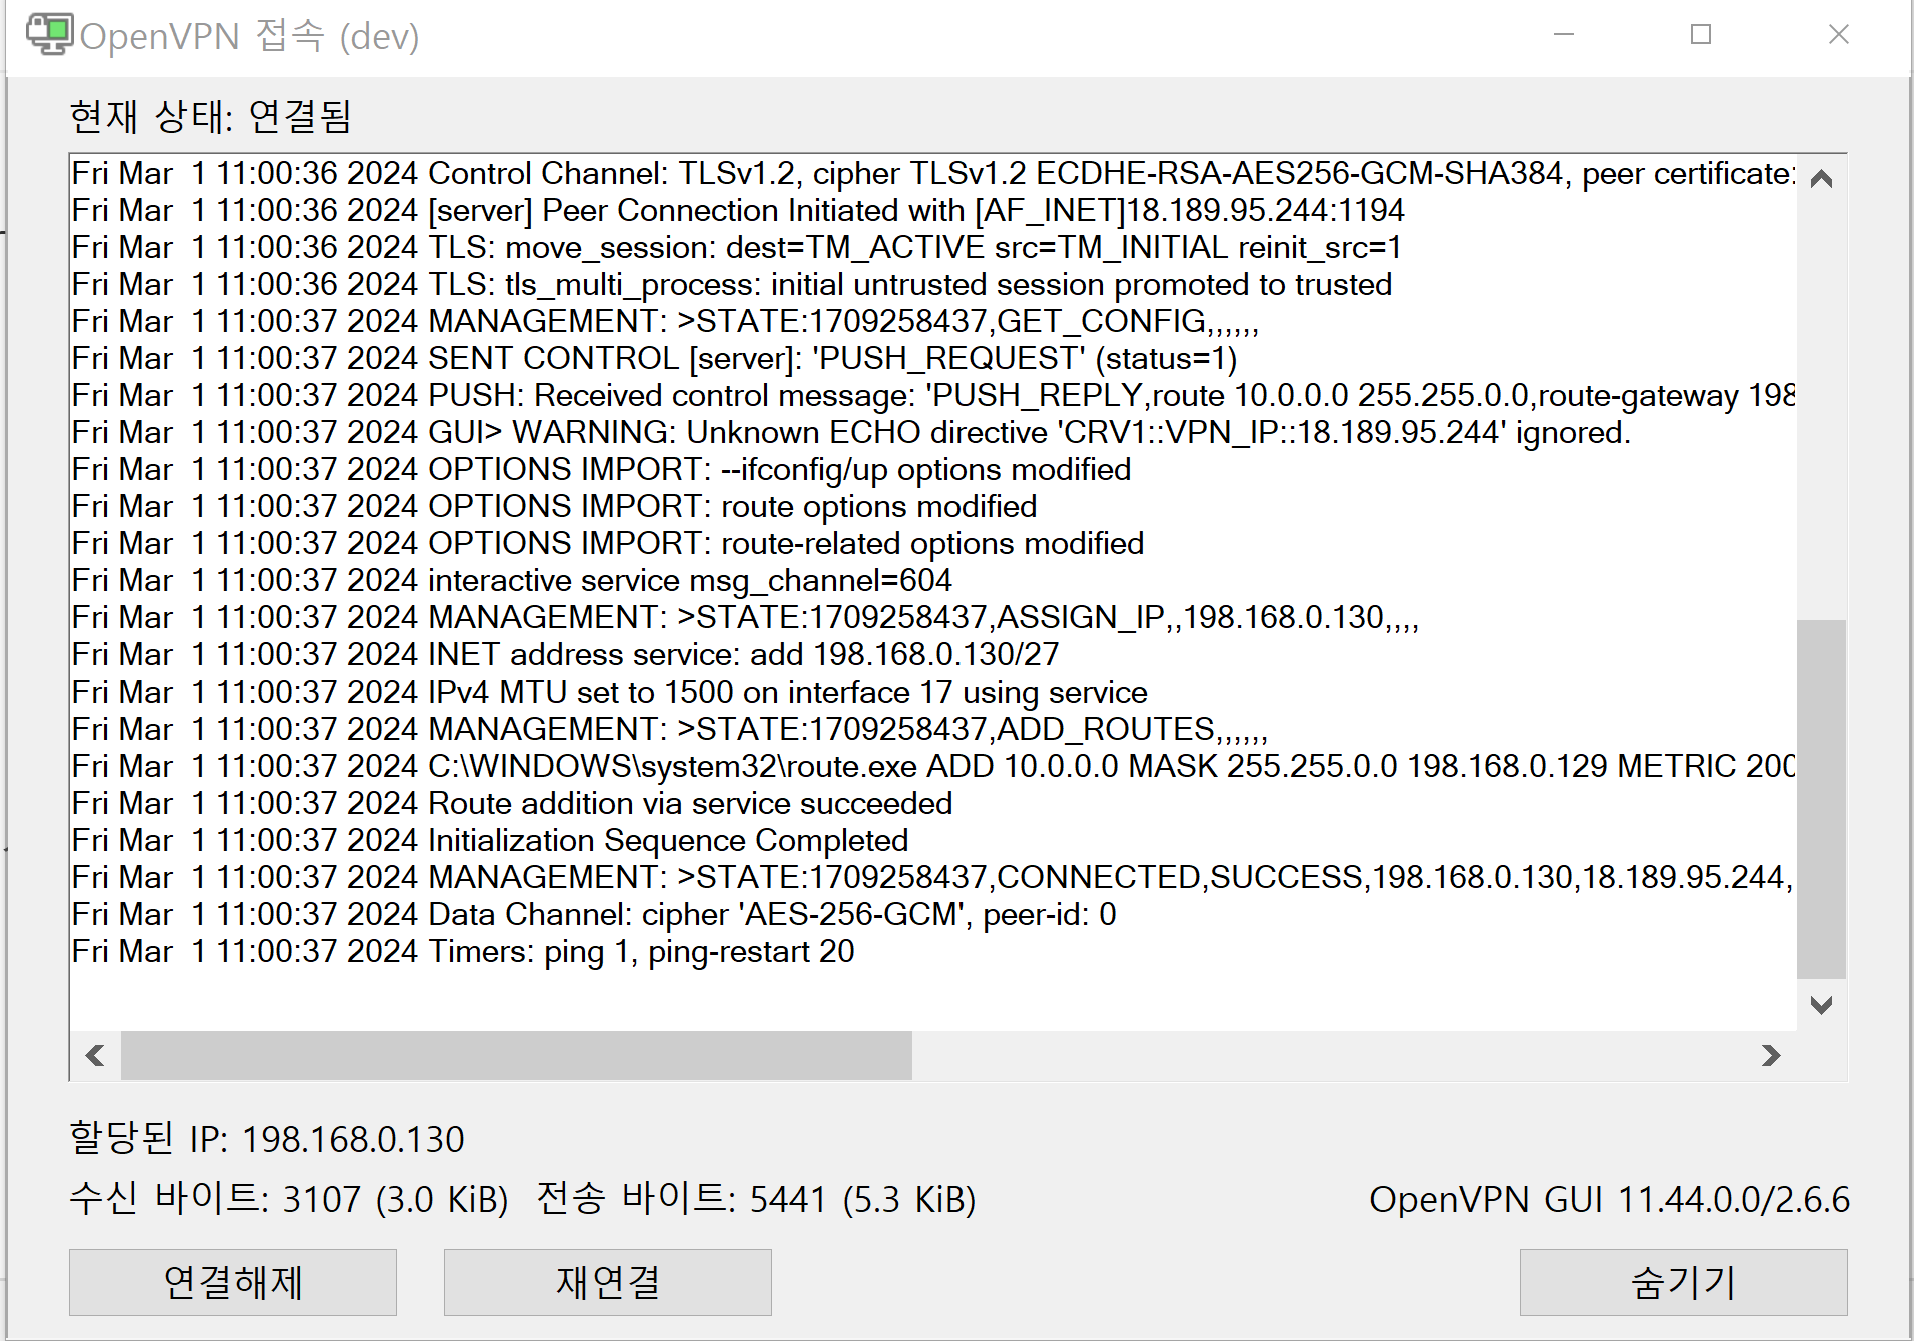
연결을 시도했던 EC2에 telnet 22 port로 접속을 시도해 보았습니다.
OpenVPN으로 Client Endpoint에 연결 후 정상적으로 telnet 접속에 성공했다는 것을 알 수 있습니다.
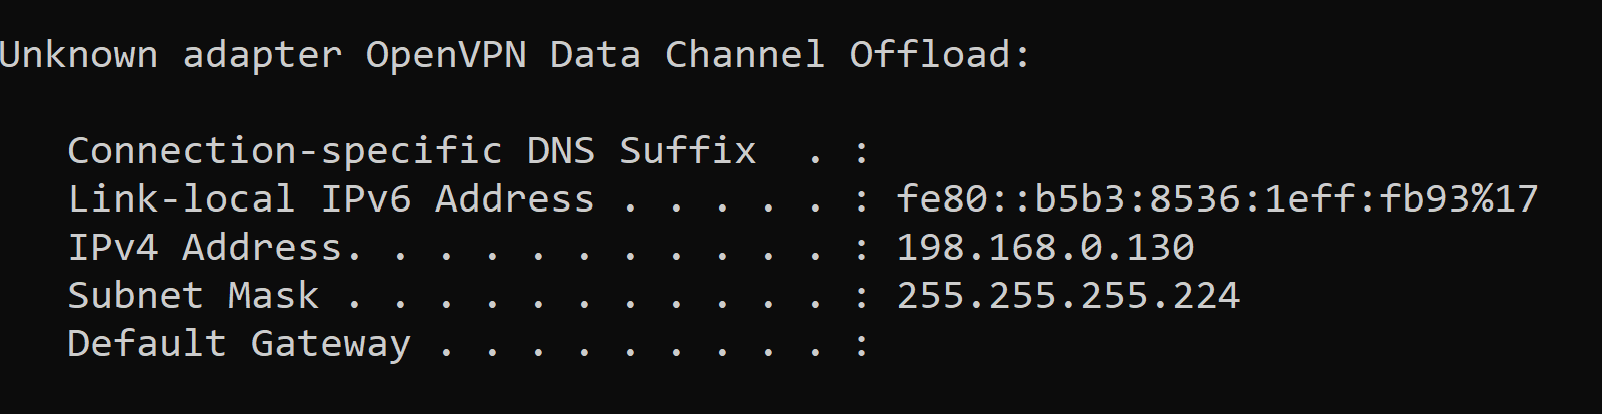
그리고 Client PC의 IP를 확인해 보았습니다.
OpenVPN Data Channel Offload 인터페이스가 있는 것을 확인할 수 있습니다.
해당 인터페이스로 내부 IP를 할당받은 것을 알 수 있습니다.
정리
AWS Client VPN 관련해서 정리해 보았습니다.
Cloud 환경 세팅 시 네트워크 보안이 중요한 이슈입니다.
Cloud 네트워크 보안은 주로 보안그룹을 통해서 진행하였습니다.
이번 기회에 Private Subnet을 구성해서 Client VPN을 통해 외부 접속환경을 구성해 보았습니다.
세팅이 번거롭지만 보안그룹을 통한 설정보다는 훨씬 안전한 환경이라 생각됩니다.
물론, Client VPN Endpoint 활성화 시 시간마다 비용이 부과되니 이점 유의해주시길 바랍니다.
[참고사이트]
상호 인증 - AWS Client VPN
Client VPN 엔드포인트는 1024비트 및 2048비트 RSA 키 크기만 지원합니다. 또한 클라이언트 인증서의 제목 필드에 CN 속성이 있어야 합니다. Client VPN 서비스에서 사용 중인 인증서가 ACM 자동 교체를 통
docs.aws.amazon.com
GitHub - OpenVPN/easy-rsa: easy-rsa - Simple shell based CA utility
easy-rsa - Simple shell based CA utility. Contribute to OpenVPN/easy-rsa development by creating an account on GitHub.
github.com
'Cloud' 카테고리의 다른 글
| 빠르게 더 빠르게!!! - AWS Placement Group (0) | 2023.09.13 |
|---|---|
| credentials 설정 안해도 되네?! - AWS EC2 IAM 연결 (0) | 2023.08.03 |
| 늘렸는데 늘어나지 않았습니다?! - AWS EBS 용량 늘리기 (0) | 2023.08.01 |
| [AWS] 비용 절감을 위한 EC2 Scheduling (0) | 2023.03.17 |
| 따릉이 대여소 정보 Dashboard 구성(5) - Parquet 형식으로 Data 변환 (0) | 2022.03.02 |


